Job clusters
Job clusters in Tator are database objects that contain credentials needed to access a remote Kubernetes cluster that can be used for processing algorithms. Remote job clusters are needed in situations where untrusted Argo workflows will be executed, or if you want to process algorithms using separate infrastructure from where the application is served. This tutorial will describe how to obtain the necessary credentials for an existing cluster, how to create a job cluster object in Tator, and how to test the connection to the job cluster.
To begin this tutorial, you must have an existing Kubernetes cluster with Argo Workflows installed. The Kubernetes API must be accessible from your Tator installation.
Create service account and token
To access the cluster remotely we grant the default service account with admin privileges and add a service account token. If this is a shared Kubernetes deployment then scope the service account to only create argo workflows.
kubectl create clusterrolebinding default-admin --clusterrole=cluster-admin --serviceaccount=default:default
kubectl apply -f - <<EOF
apiVersion: v1
kind: Secret
metadata:
  name: default.service-account-token
  annotations:
    kubernetes.io/service-account.name: default
type: kubernetes.io/service-account-token
EOF
Obtain service account credentials
Now we need to retrieve the token and certificate associated with the service account token we just created.
To obtain the token:
echo "Bearer" $(kubectl describe secret default.service-account-token | grep -E '^token' | cut -f2 -d':' | tr -d " ")
To obtain the certificate:
kubectl get secret default.service-account-token -o yaml | grep -E '^ ca.crt' | cut -f2 -d':' | tr -d " " | base64 --decode
Create the job cluster object in Tator
In the Tator web interface, navigate to the organization settings for the organization you wish to use for this job cluster and click on the + symbol next to Job Clusters, then enter the token, certificate, as well as the host and port of the Kubernetes API server.
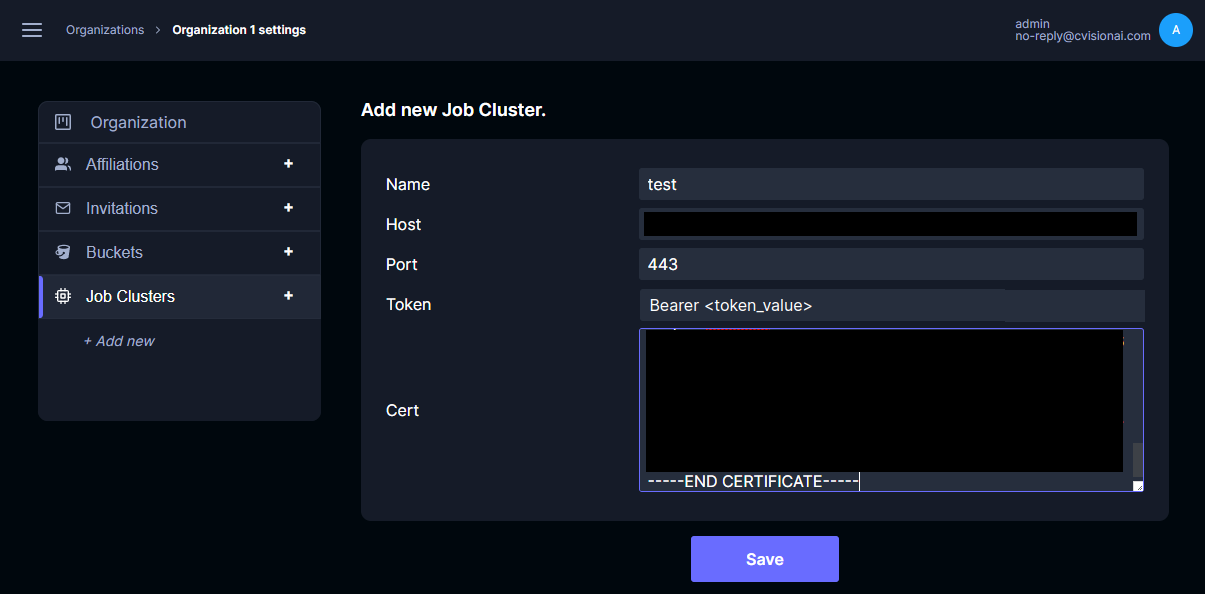
- The host should NOT contain the protocol (http:// or https://).
- The token MUST be prepended with the word "Bearer" followed by a space.
Click Save.
Test the connection
To test the connection to the remote cluster, we will use the Kubernetes python client from inside a gunicorn shell. One the Tator Kubernetes cluster, enter a Django shell:
make django-shell
Now test the connection with the following:
import tempfile
from kubernetes.client import Configuration, ApiClient, CoreV1Api
from main.models import JobCluster
cluster = JobCluster.objects.last() # Replace with other filters to find the object you want to test
fd, cert = tempfile.mkstemp(text=True)
with open(fd, 'w') as f:
    f.write(cluster.cert)
conf = Configuration()
conf.api_key['authorization'] = cluster.token
conf.host = f'https://{cluster.host}:{cluster.port}'
conf.verify_ssl = True
conf.ssl_ca_cert = cert
api_client = ApiClient(conf)
v1 = CoreV1Api(api_client)
v1.list_pod_for_all_namespaces()
You should see a listing of all pods running on the remote cluster. If you do not, you should see a descriptive error of the connection issue and can correct the job cluster object before attempting to test the connection again.
Test an algorithm
Now we can create an Algorithm object that uses the job cluster. Go to the project settings page for a project under the same organization as the job cluster, and click the + sign next to Algorithms. Select the job cluster that was just created, give a descriptive name, and set a high number of files per job (this is the number of files that will be supplied as arguments to each workflow).
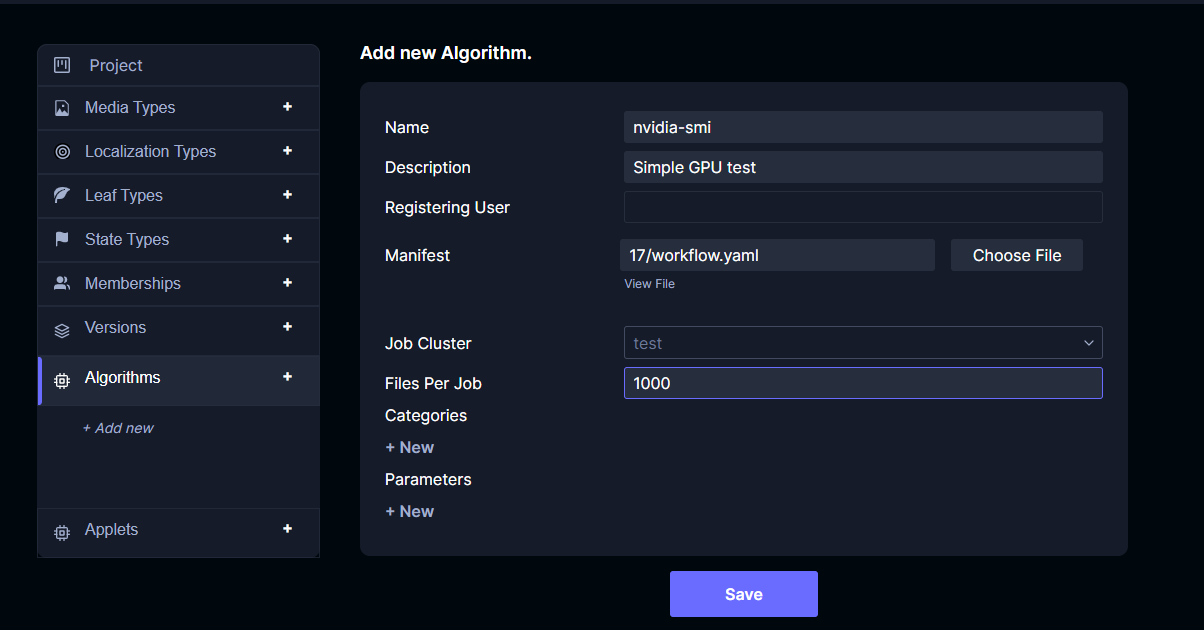
You will need to upload an Argo Workflow manifest. The example below simply runs the nvidia-smi command on a GPU node. If you do not have GPU nodes in your cluster, you can use the basic example manifest from Argo.
apiVersion: argoproj.io/v1alpha1
kind: Workflow
metadata:
  generateName: nvidia-smi-
spec:
  entrypoint: main
  templates:
  - name: main
    container:
      image: nvidia/cuda:11.7.1-devel-ubuntu22.04
      command: [nvidia-smi]
      resources:
        limits:
          nvidia.com/gpu: 1
Click Save.
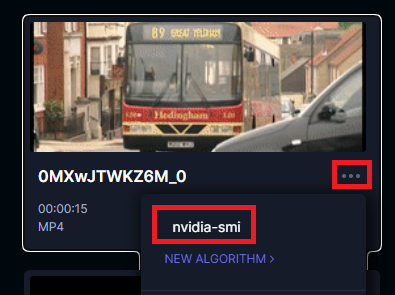
Now you can open the project detail view and launch the algorithm on a media file.
Once the workflow is launched, you can use the Argo CLI to monitor the workflow and inspect the logs for the appropriate output.
$ argo list
NAME                                         STATUS    AGE   DURATION   PRIORITY
alg-82-proj-17-usr-1-name-nvidia-smi-lc78h   Running   19s   19s        0
$ argo logs -f alg-82-proj-17-usr-1-name-nvidia-smi-lc78h
alg-82-proj-17-usr-1-name-nvidia-smi-lc78h: Wed Aug 31 16:27:22 2022
alg-82-proj-17-usr-1-name-nvidia-smi-lc78h: +-----------------------------------------------------------------------------+
alg-82-proj-17-usr-1-name-nvidia-smi-lc78h: | NVIDIA-SMI 470.57.02    Driver Version: 470.57.02    CUDA Version: 11.7     |
alg-82-proj-17-usr-1-name-nvidia-smi-lc78h: |-------------------------------+----------------------+----------------------+
alg-82-proj-17-usr-1-name-nvidia-smi-lc78h: | GPU  Name        Persistence-M| Bus-Id        Disp.A | Volatile Uncorr. ECC |
alg-82-proj-17-usr-1-name-nvidia-smi-lc78h: | Fan  Temp  Perf  Pwr:Usage/Cap|         Memory-Usage | GPU-Util  Compute M. |
alg-82-proj-17-usr-1-name-nvidia-smi-lc78h: |                               |                      |               MIG M. |
alg-82-proj-17-usr-1-name-nvidia-smi-lc78h: |===============================+======================+======================|
alg-82-proj-17-usr-1-name-nvidia-smi-lc78h: |   0  Tesla T4            On   | 00000000:00:1E.0 Off |                    0 |
alg-82-proj-17-usr-1-name-nvidia-smi-lc78h: | N/A   29C    P8     9W /  70W |      0MiB / 15109MiB |      0%      Default |
alg-82-proj-17-usr-1-name-nvidia-smi-lc78h: |                               |                      |                  N/A |
alg-82-proj-17-usr-1-name-nvidia-smi-lc78h: +-------------------------------+----------------------+----------------------+
alg-82-proj-17-usr-1-name-nvidia-smi-lc78h:
alg-82-proj-17-usr-1-name-nvidia-smi-lc78h: +-----------------------------------------------------------------------------+
alg-82-proj-17-usr-1-name-nvidia-smi-lc78h: | Processes:                                                                  |
alg-82-proj-17-usr-1-name-nvidia-smi-lc78h: |  GPU   GI   CI        PID   Type   Process name                  GPU Memory |
alg-82-proj-17-usr-1-name-nvidia-smi-lc78h: |        ID   ID                                                   Usage      |
alg-82-proj-17-usr-1-name-nvidia-smi-lc78h: |=============================================================================|
alg-82-proj-17-usr-1-name-nvidia-smi-lc78h: |  No running processes found                                                 |
alg-82-proj-17-usr-1-name-nvidia-smi-lc78h: +-----------------------------------------------------------------------------+