Labeling activites
Users can label video segments of interest, or activities, directly within the annotator. To enable this, state types must be registered with specific criteria outlined in this tutorial. This tutorial will cover how to setup projects to annotate activities (i.e. Boolean conditions and numerical values associated with video frames) both within a single video and those that span multiple videos.
Annotating activities within a single video
Boolean activities
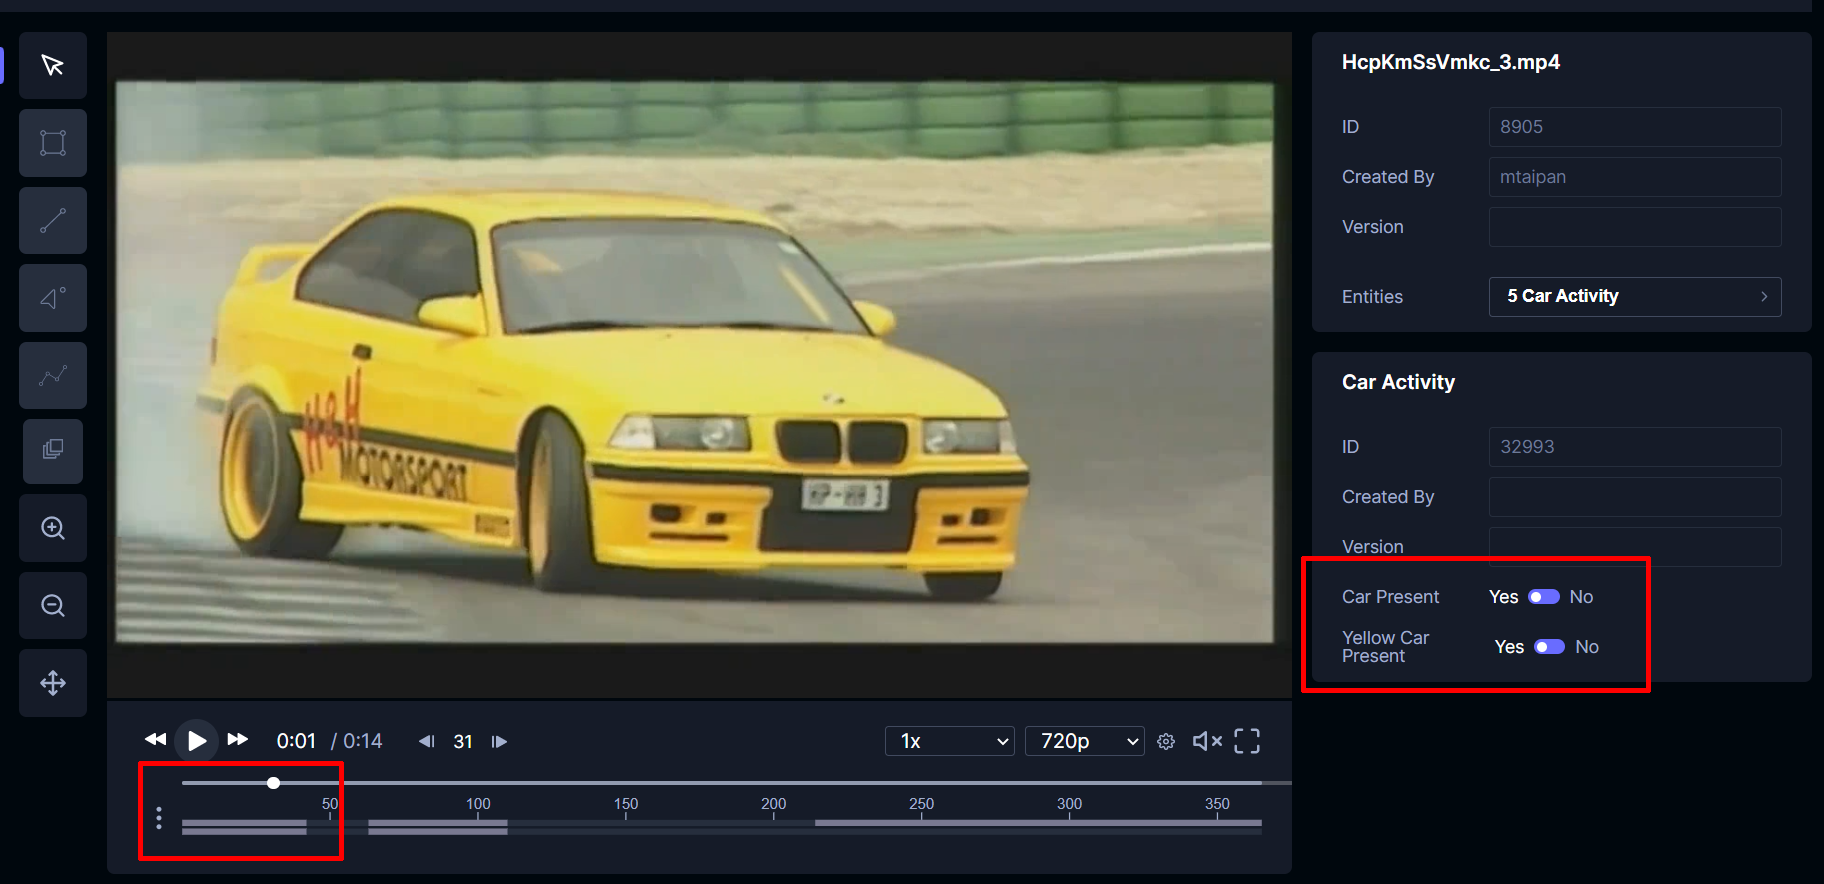
The image below shows a project that is set up for users to annotate car activity within a video. The annotator on the right will select the appropriate Boolean conditions (Car Present and Yellow Car Present). The selected activity states will be reflected in the timeline below the video controls, giving the annotator a visual indicator depicting the duration of the activity. This image depicts both activities are present.
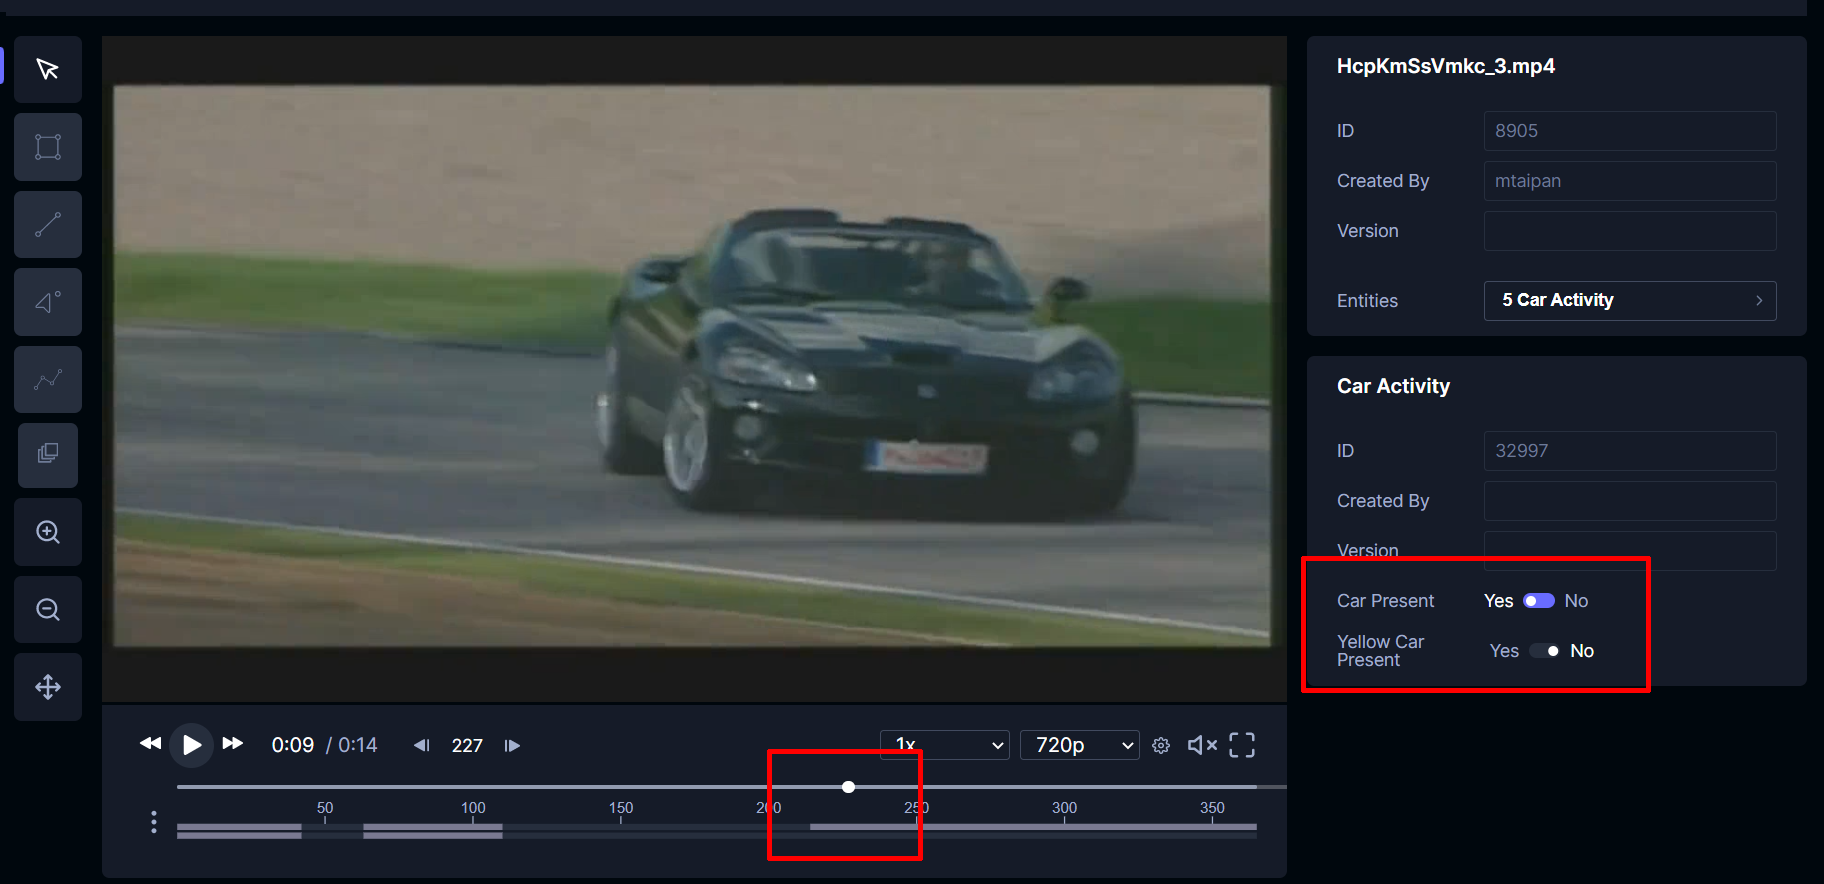
In this image, only Car Present is true. Notice how the timeline only has one bar highlighted, indicating the Car Present activity is true while the Yellow Car Present is false.
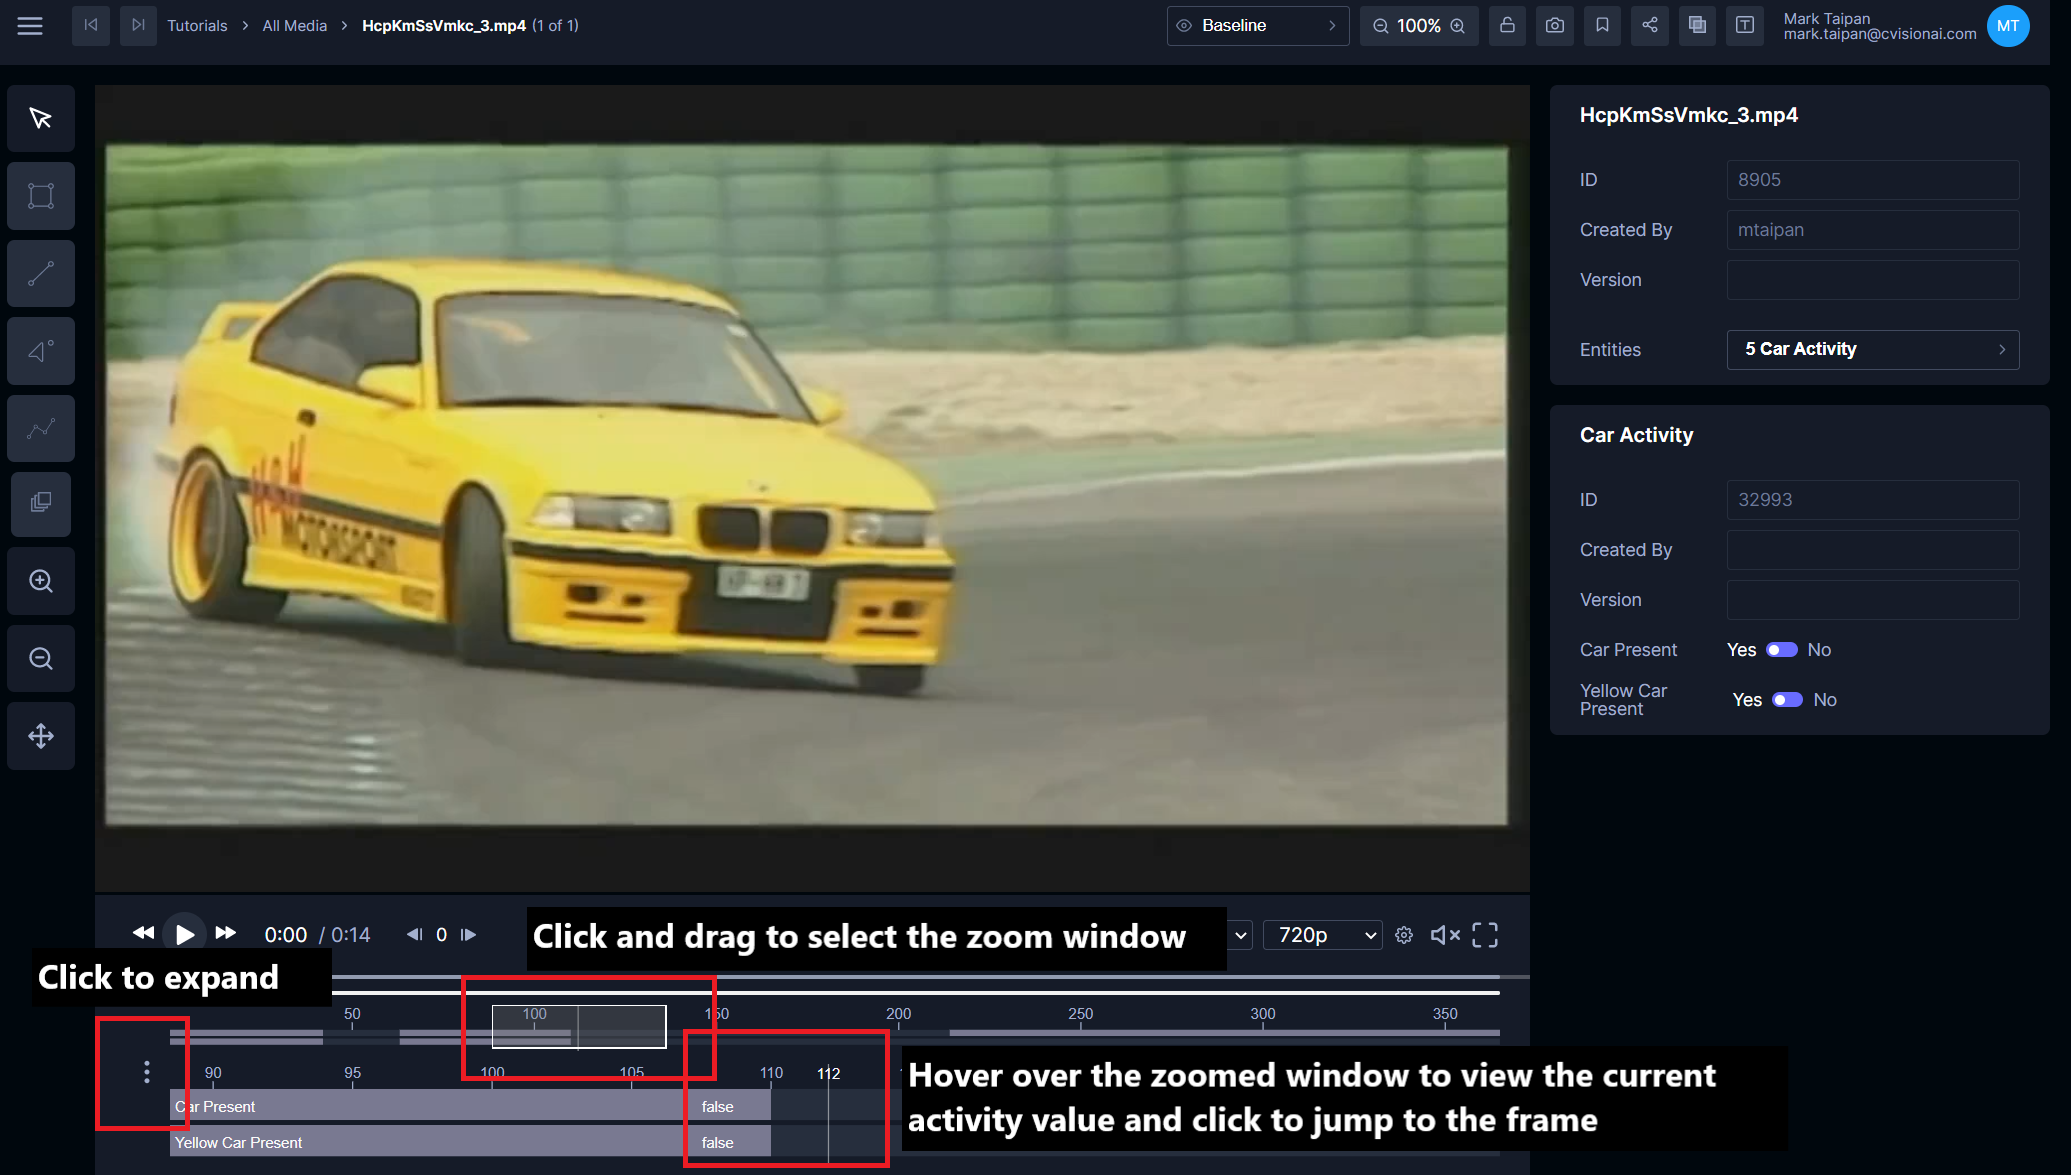
The timeline can also be expanded by clicking the three dots on the left of the video timeline. From there, annotators can click and drag to select a zoomed-in window. This will allow annotators to hover and inspect each activity values more closely. Clicking in this zoomed-in window will jump the annotator to that frame.
Below is the Python command used to create this activity annotation example. Specifically, a state type is created using tator-py. This can also be created via the project settings page.
tator_api.create_state_type(project=project_id, state_type_spec={
  "name": "Car Activity",
  "description": "Used to demonstrate annotating in-video activities",
  "dtype": "state",
  "interpolation": "latest",
  "association": "Frame",
  "visible": True,
  "media_types": [video_id],
  "attribute_types": [
    {
      "name": "Car Present",
      "dtype": "bool",
      "default": False,
      "order": 0,
    },
    {
      "name": "Yellow Car Present",
      "dtype": "bool",
      "default": False,
      "order": 1,
    },
  ],
})
The combination of latest: interpolation and association: Frame is required to enable annotators to mark frames with activity. The Car Present and Yellow Car Present attributes are two example Boolean attributes enabling the annotator to mark video frames where the activity changes from one condition to another (e.g. Yellow Car Present changed from false to true in frame 35). All other fields defined in the state type are not specific to this activity annotation type.
Numerical activities
Numerical values can also be displayed within the timeline. The example below adds an Activity Recognition floating point attribute to the existing Car Activity state using the project settings page.
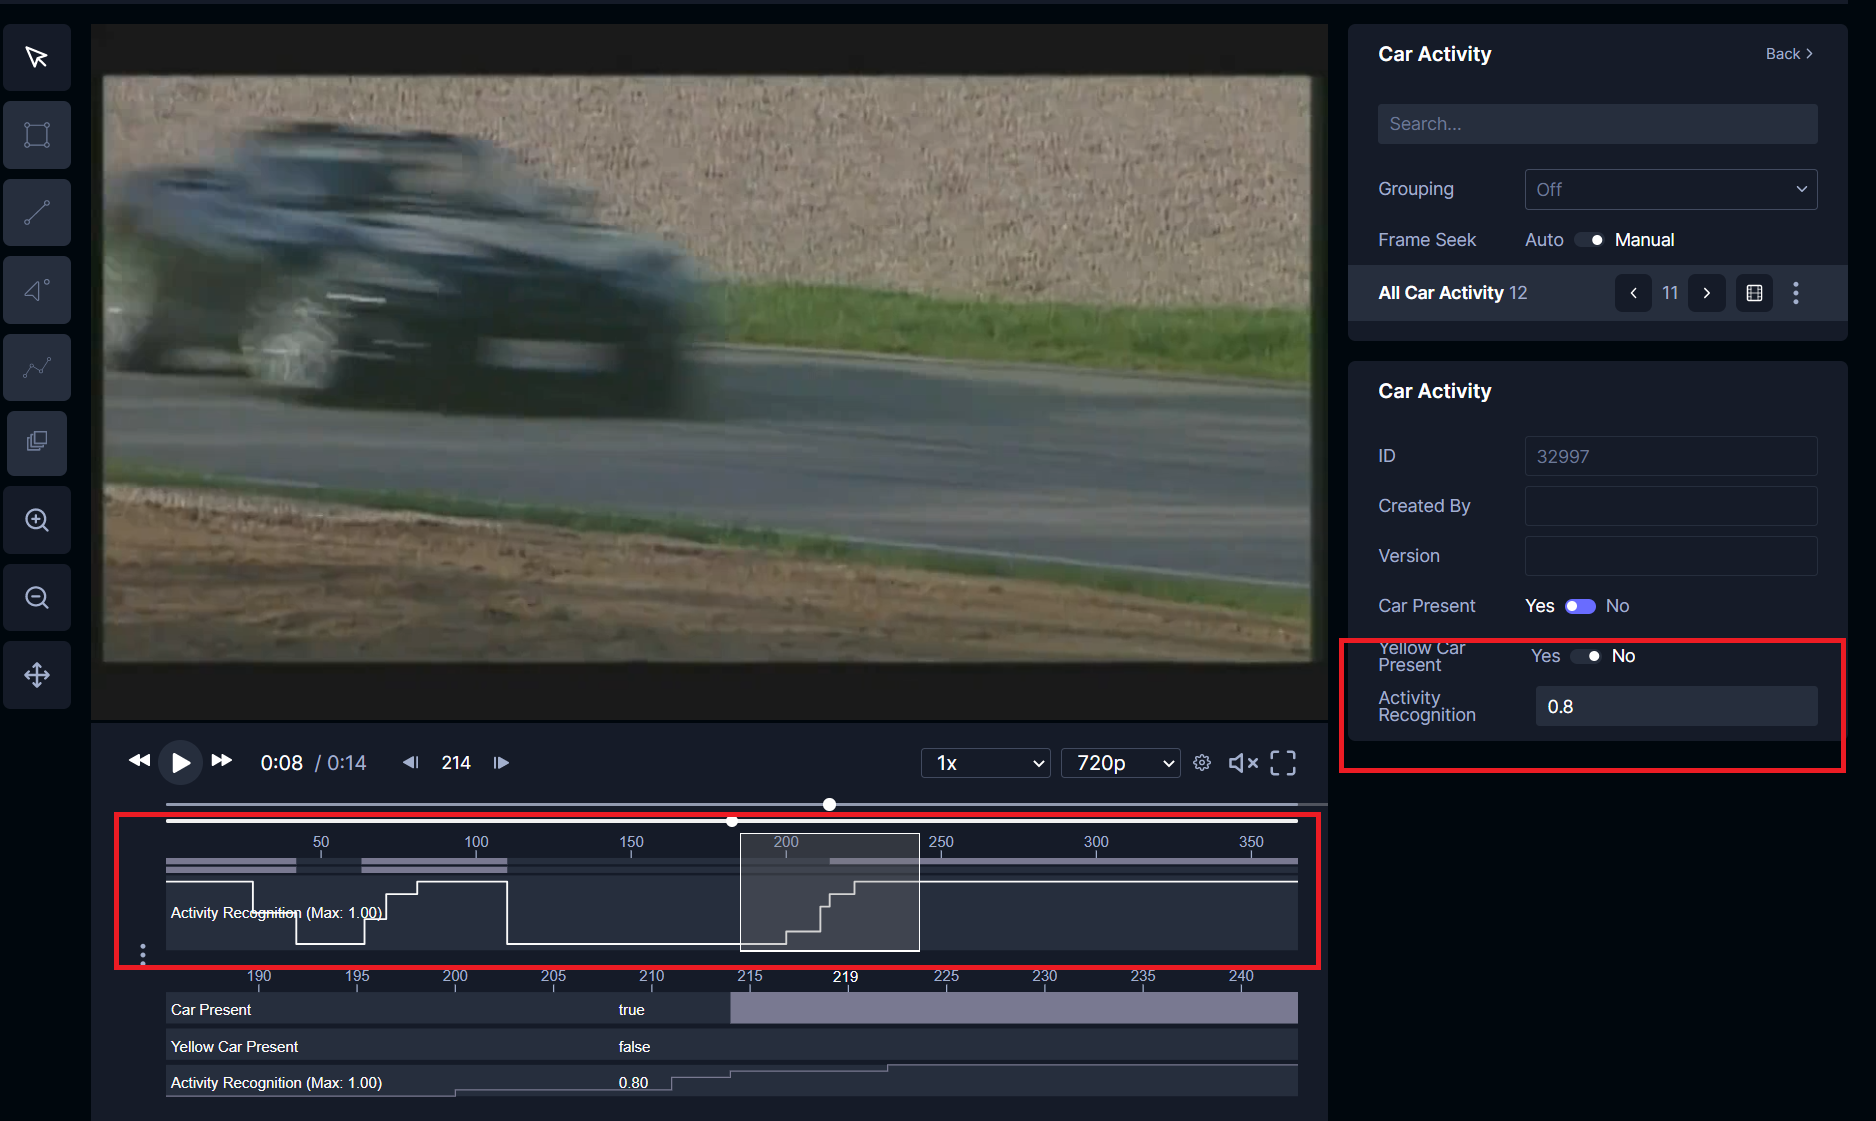
Like the Boolean activity states discussed earlier, annotators can set numerical values associated with a frame (in this example, Activity Recognition) via the annotator or programmatically. Due to the use of interpolation: latest, we can see above the numerical value displayed in the timeline is a step function that holds the last inputted value (i.e. the previous state). The annotator will show the relevant state on the right panel. The entity browser can also be used to cycle between each state. It is important to note that the annotator only creates a frame associated state when there is a new value with any of its attributes. A state is not created for every frame in the video. If a state does exist for the current frame, that annotator patches that state.
Annotating activities spanning multiple videos
In the previous section, we discussed creating frame-associated states to annotate activities within a single video. There are times where annotators want to correlate states between different video clips (i.e. different media). The current recommended method is to utilize the interpolation: attr_style_range value (instead of latest that we showed above). This method only applies to annotating Boolean activity states. This enables annotators to denote activities that either don’t start or end in a particular video. Project developers can then take these states and programmatically piece the activities together.
The attr_style_range correlates with the style field of a state’s attribute. In this tutorial, we will annotate a car is present that spans two videos. The Python command below creates the appropriate state type using tator-py. Take note of the use of attr_style_range and the attributes’ style fields.
tator_api.create_state_type(project=project_id, state_type_spec={
  "name": "Multi-Video Car Activity",
  "description": "Used to demonstrate annotating activities spanning multiple videos",
  "dtype": "state",
  "interpolation": "attr_style_range",
  "association": "Frame",
  "visible": True,
  "media_types": [video_id],
  "attribute_types": [
    {
      "name": "CarPresent",
      "default": "Car Start|Car End|Car In Video",
      "dtype": "string",
      "style": "range_set",
      "order": -1
    },
    {
      "name": "Car Start",
      "dtype": "int",
      "default": -1,
      "minimum": -1,
      "style": "start_frame",
      "order": 0
    },
    {
      "name": "Car End",
      "dtype": "int",
      "default": -1,
      "minimum": -1,
      "style": "end_frame",
      "order": 1
    },
    {
      "name": "Car In Video",
      "dtype": "bool",
      "default": False,
      "style": "in_video_check",
      "order": 2
    }
  ],
})
There are four main components that are affected by the style field:
style value | Description |
|---|---|
| "range_set" | This defines what attributes in the same state type are linked together. The default field denotes what attributes they are and are separated by the | character. |
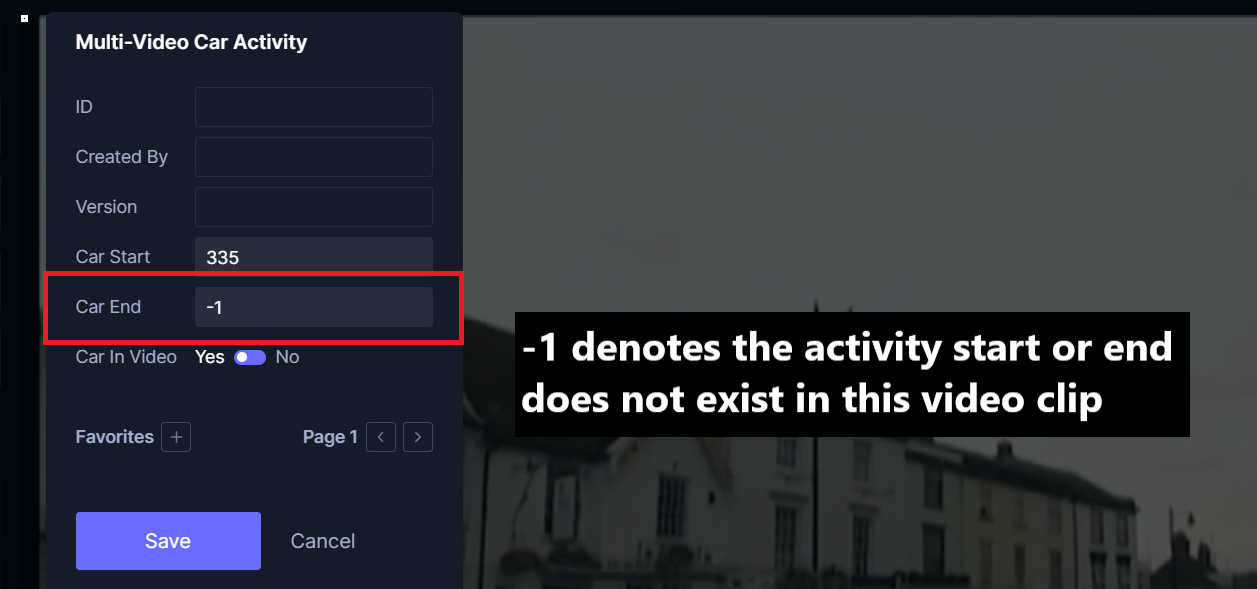
| "start_frame" | This defines the activity start’s frame number for the current video. Note that -1 is used as the minimum value. If this attribute's value is -1, this denotes the activity does not start in this video. |
| "end_frame" | This defines the activity end’s frame number for the current video. Note that -1 is used as the minimum value. If this attribute's value is -1, this denotes the activity does not end in this video. |
| "in_video_check" | This defines if the activity is present within the video. It’s possible the activity does not start or end in the video (which will result in -1 frame values for the two corresponding frame start/end attributes). This will ensure the activity is properly annotated and displays correctly in the annotator timeline. |
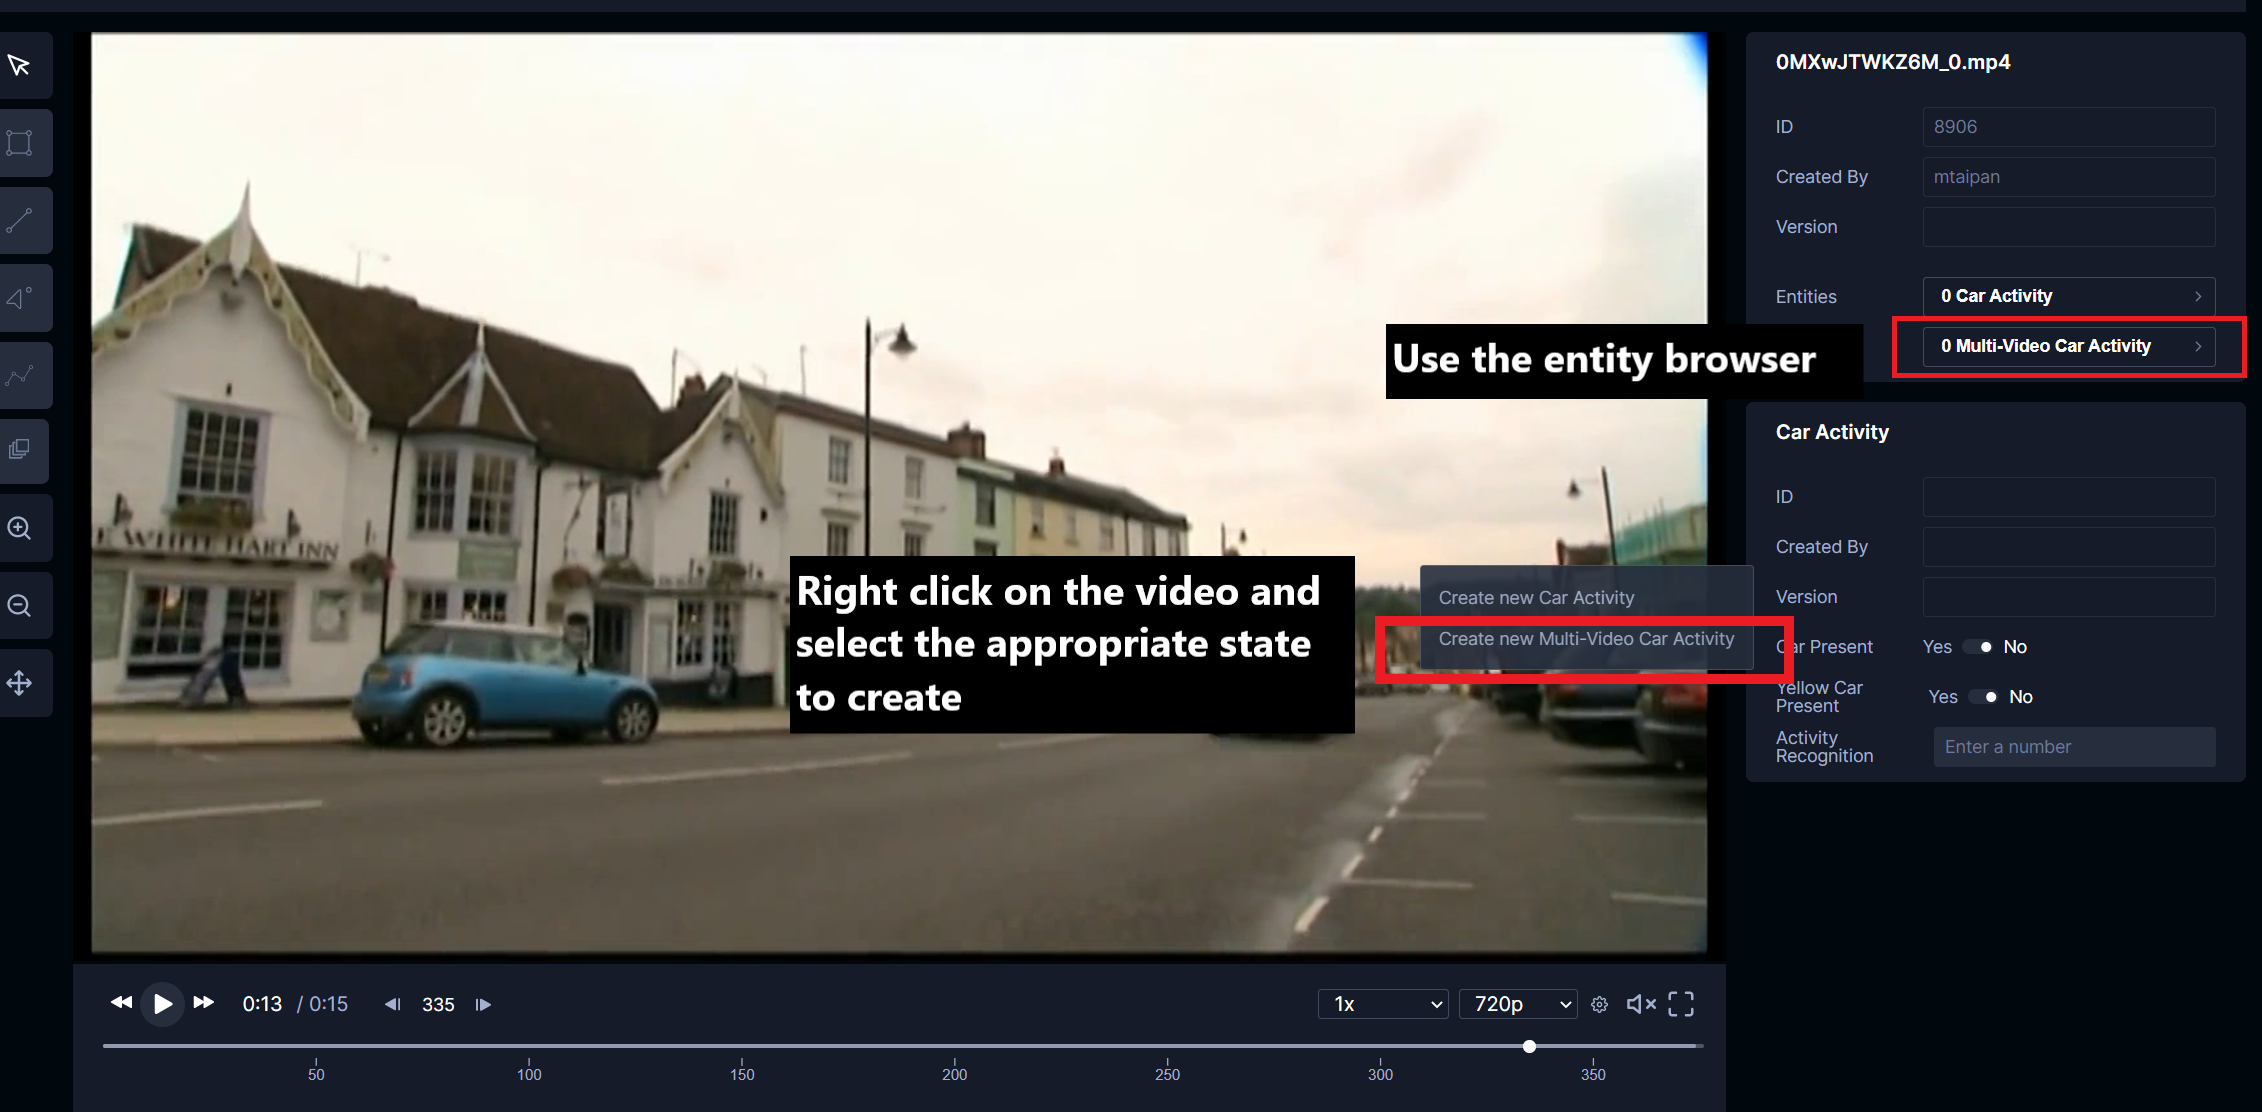
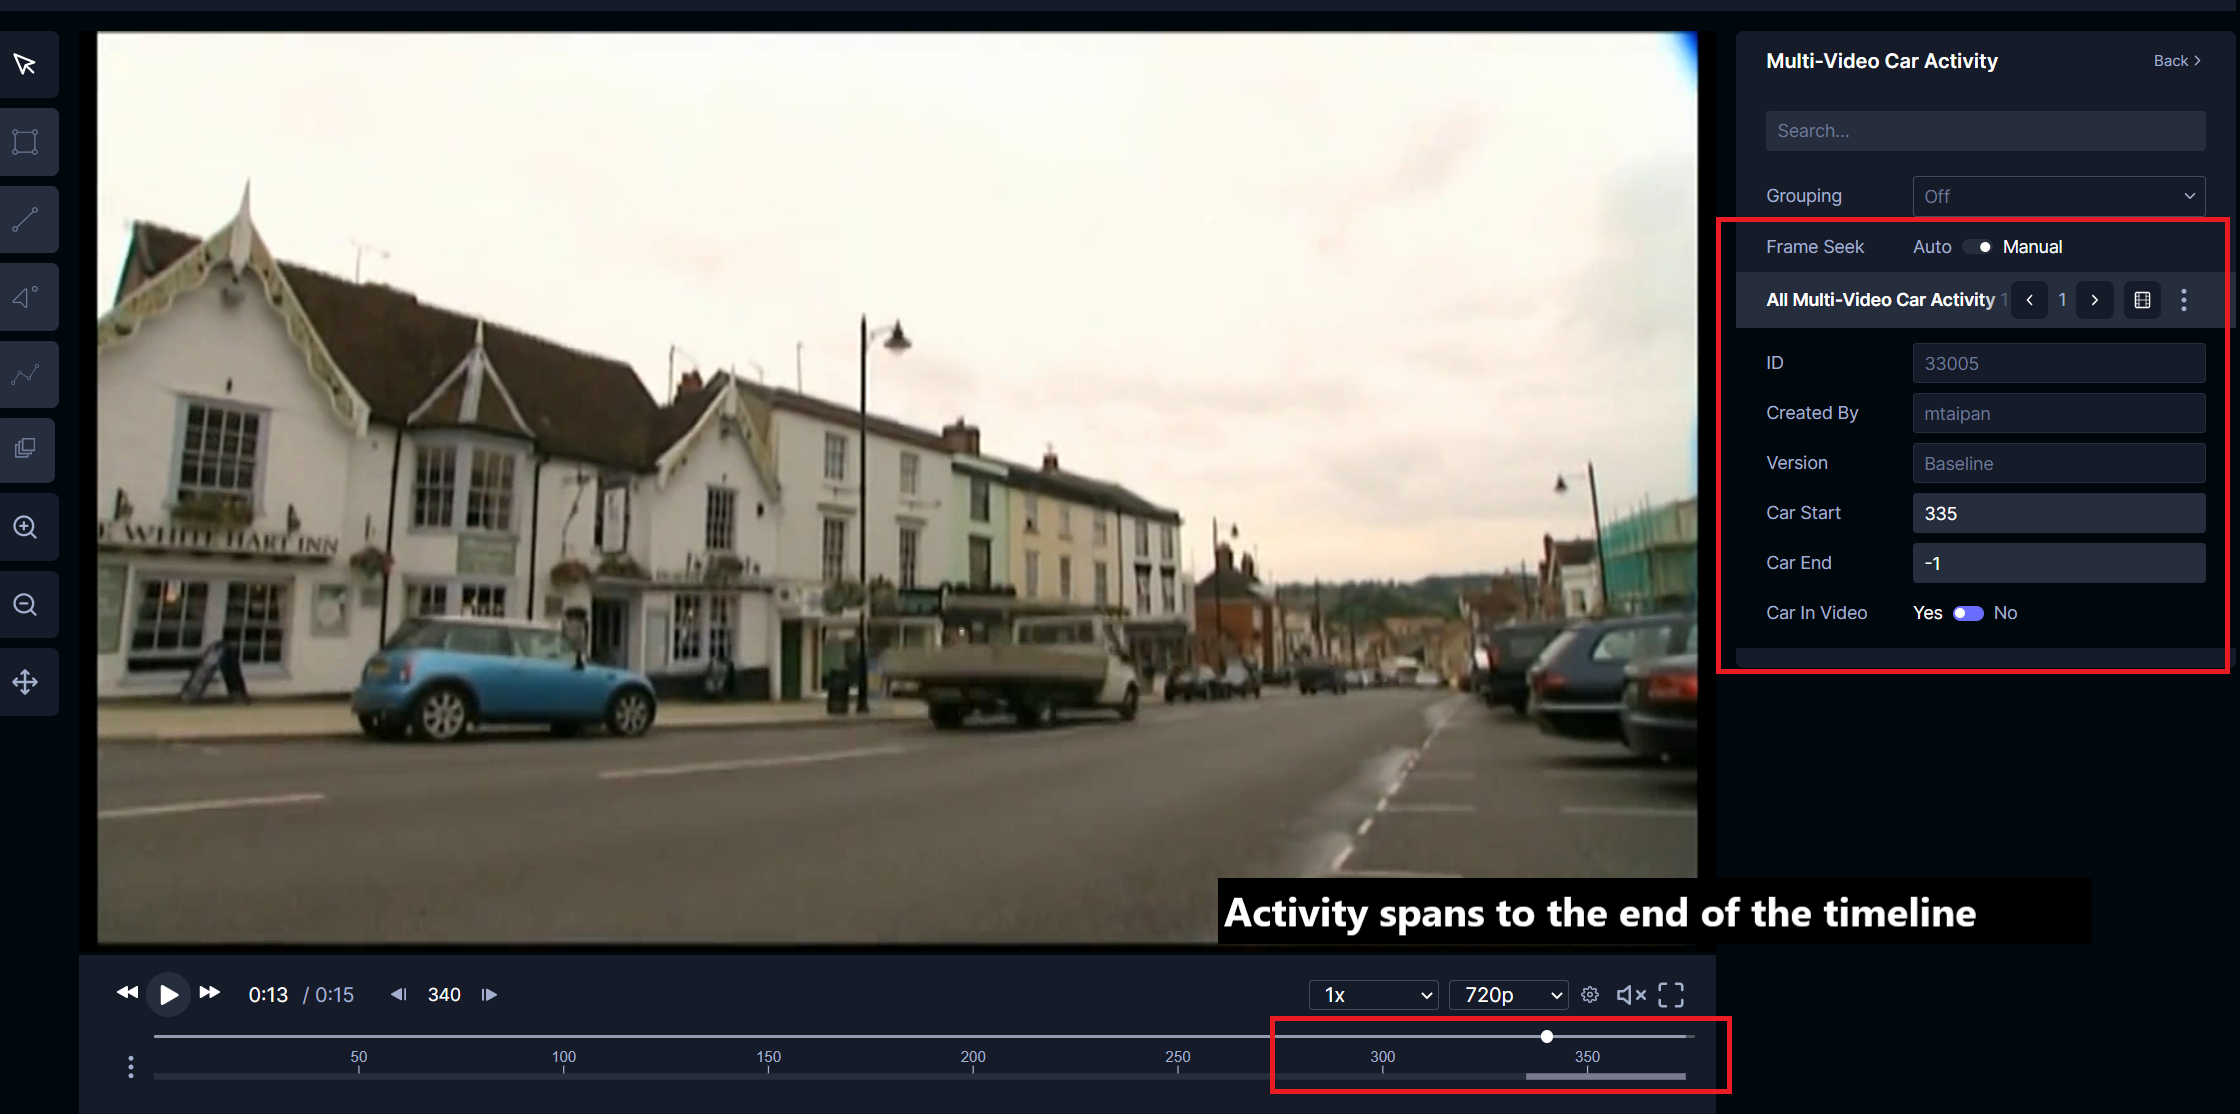
With this setup, the following images will depict how users will annotate the activity across multiple videos using the example state type above. To create this state, the user will right click on the video, and select the appropriate state (Multi-Video Car Activity for this example). Note: Unlike the previous state type we covered that uses interpolation: latest, this type of activity can only be interacted with the entity browser and not a separate frame panel.
Next, the user will input the appropriate start and end frame activity information. In this example, the activity starts in this video but will end in the next video. The activity can be updated using the entity browser and the activity status will be reflected in the timeline.
In the next video, the user will create a new state again but input the activity as starting in a previous video but ends in this video on frame 150.

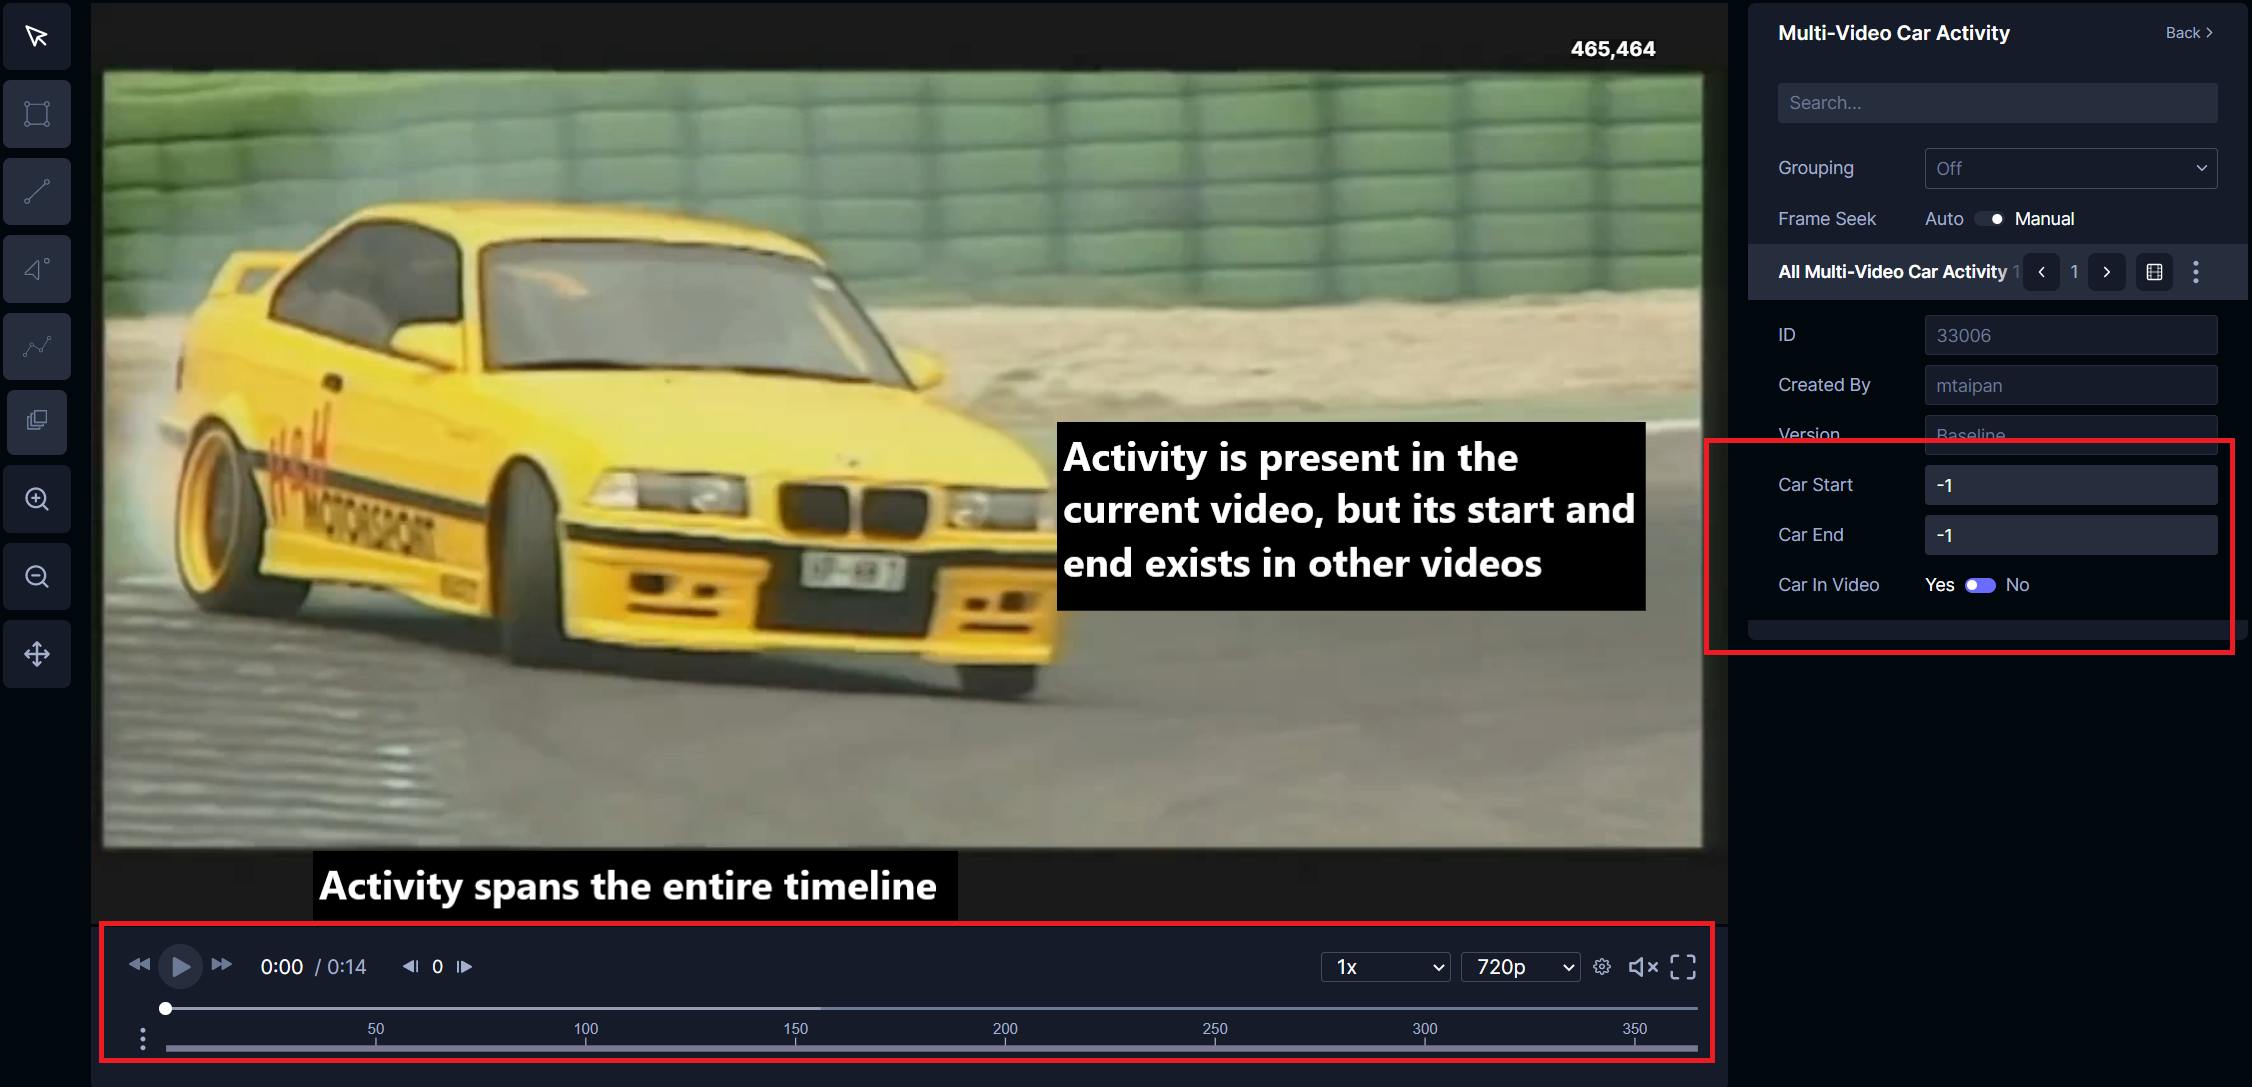
If the activity is present in the video but the start and end occurs in other videos, the start and end frames can be set to -1 along with the in_video_check set to true. The timeline will reflect the presence of the activity.