Create annotator menu applets
Applets can be used to tailor the annotator experience for a particular project. One such applet is the menu applet, which is accessible by right clicking on the image or video in the annotator. After clicking the menu option, a dialog window displays the applet and enables the user to perform customized actions for the current frame. Using the Tator REST interface, information can be modified by the applet itself via fetch calls. This tutorial will demonstrate how to create an annotator menu applet.
Applet Overview
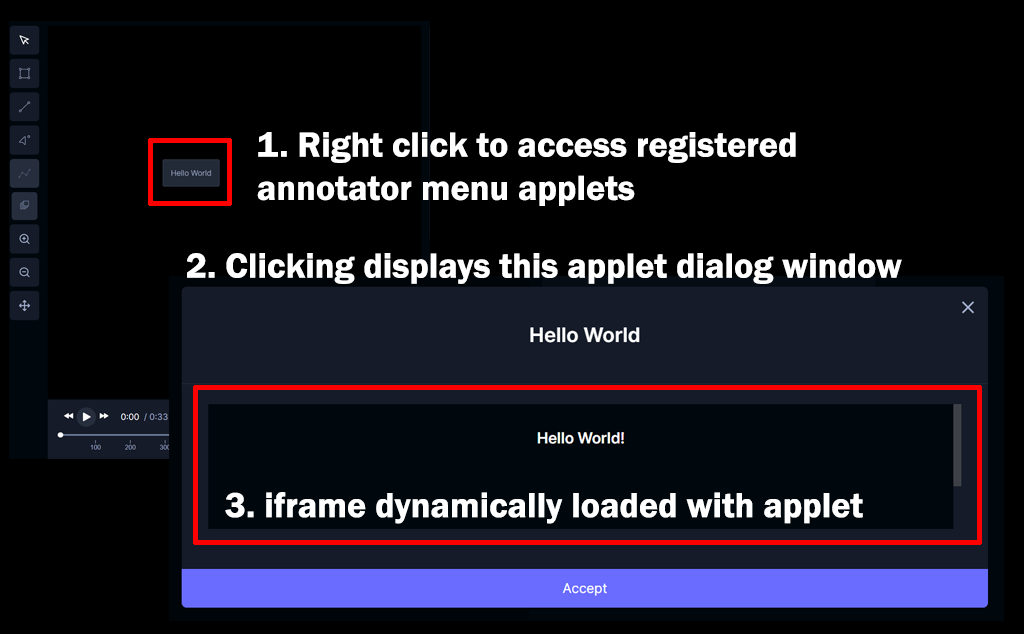
Applets are HTML files that are loaded into an iframe. For annotator menu applets specifically, they are dynamically loaded in an modal dialog shown whenever the user clicks the corresponding right click menu option. The image below shows an example of this type of applet. The iframe in the applet dialog is the darker portion of the modal and is loaded with the selected applet.
There are two main components of the applet HTML file: the HTML file that displays the content and the JavaScript class that extends the MenuAppletElement base class. Information about the current media, frame, and selected version are passed along to a singleton of this MenuAppletElement child class. This allows developers to create customizable frame-specific annotator functions accessible to users without needing to launch a separate argo workflow.
Styling
Annotator menu applets are HTML pages that utilize the existing tatorUi library. Since the applet is loaded into an iframe, the HTML head/body code defines what is displayed to the user. Custom CSS can be defined here in the HTML file. If desired, Tator's main CSS file can be referenced with:
<link rel="stylesheet" type="text/css" href="/static/components.css"></link>
The iframe is a flex element and its styling cannot presently be altered from the applet. The dimensions of the applet dialog itself can be altered. Refer to the Applet Interface section for more information.
Applet Interface
The interface to communicate with the rest of the Tator annotator page is via a singular object whose parent class is MenuAppletElement. The applet dialog window (which resides in the annotator-page) calls functions defined by this class.
MenuAppletElement Parent Class
The Applet html_file must define a JavaScript class that extends MenuAppletElement. This can be accomplished by referencing the exported webpack tatorUi library:
<script src="/static/annotation.js"></script>
<script>
class NewApplet extends tatorUi.annotation.MenuAppletElement {
  ...
}
customElements.define("new-applet", NewApplet);
</script>
Parent Functions
There are parent functions defined in MenuAppletElement that are called by the applet dialog window. These functions have defaults, but they are expected to be overridden by the child class to provide the customized user experience. The following table outlines the functions and its role. Refer to the menu-applet-element.js source code for more information.
| Function | Description |
|---|---|
getModalHeight | Set applet's iframe's height with a specific pixel string (e.g. "100px"). If an empty string is returned, the height is not adjusted. |
getModalWidth | Set the modal's width. The width of the modal cannot be adjusted to a specific width. However, three widths are provided: "default" |
getModalTitle | Set the modal's title |
getAcceptButtonText | Set the modal's accept button's textContent |
updateData | Update the applet with the current data. This is called when the applet is loaded (i.e. user clicks the menu option) and before updateUI is called. The following fields are set in the object's _data field: (frame, version, media, projectId). More specific information can be found in the setApplet function in menu-applet-dialog.js |
updateUI | Explicitly updates applet's UI. This is called when the applet is loaded (i.e. user clicks the menu option) and after the updateData function has been called. |
accept | Called when the user presses the accept button. This is effectively the last action of the applet. |
Events
To dynamically communicate with the annotator page itself, events can be dispatched from the applet. The following events are listened to by the applet dialog window.
| Event | .detail Fields | Description |
|---|---|---|
| displayProgressMessage | message: string | Displays a progress message in the annotator header |
| displayErrorMessage | message: string | Displays an error message in the annotator header |
| displaySuccessMessage | message: string | Displays a success message in the annotator header |
| displayLoadingScreen | None | Displays the loading screen and disables user control of the annotator. The applet must emit the hideLoadingScreen event to restore control back to the user. |
| hideLoadingScreen | None | Hides the loading screen and reenables user control. |
Required ID
It is expected that there is a single HTML element whose id is mainApplet of the newly defined applet class (example shown below). This ID is used by the dialog window to directly communicate with the instantiated applet.
<div>
  <new-applet id="mainApplet"></new-applet>
</div>
Registering Applets
Applets can be registered via tator-py or through the project settings page. To specifically register an annotator right-click menu applet, its categories list must include annotator-menu. If it does not have this category, it will be not be included in the right-click menu options and may be included in other Applet lists such as the Dashboard Portal.
Note: The name of the applet is what is displayed in the right click menu.
Example Applet
The following .html file is an example annotator menu applet
<!DOCTYPE html>
<html>
<head>
  <link rel="stylesheet" type="text/css" href="/static/components.css"></link>
  <script src="/static/annotation.js"></script>
</head>

<body style="padding: 0px;">

<script>

class HelloWorld extends tatorUi.annotation.MenuAppletElement {
  constructor() {
    super();

    // Create the main div content area
    this._contentDiv = document.createElement("div");
    this._contentDiv.setAttribute("class", "d-flex flex-grow flex-column text-gray f2 px-4 py-2");
    this._contentDiv.style.height = "212px";
    this._shadow.appendChild(this._contentDiv);

    var label = document.createElement("div");
    label.setAttribute("class", "h3 text-white text-semibold px-3 py-2 my-3 text-center");
    label.textContent = "Hello World!";
    this._contentDiv.appendChild(label);
  }

  /**
   * @returns string
   */
  getModalTitle() {
    return "Hello World";
  }

  /**
   * Review menu-applet-dialog.js for more information about expected values.
   * @returns string
   */
  getModalWidth() {
    return "wide";
  }

  /**
   * Override parent method
   */
   accept() {
     this.dispatchEvent(new CustomEvent(
       "displaySuccessMessage", {
        detail: {
          message: "Success message!"
        }
     }));
   }
}

customElements.define("hello-world-menu-applet", HelloWorld);

</script>

<div>
  <hello-world-menu-applet id="mainApplet"></hello-world-menu-applet>
</div>

</body>
</html>