Canvas Applets
New in Tator 1.2.
In this tutorial we will walk through the source code for a simple canvas applet example, then apply the example by registering it in a project and interacting with it. The example can be used as a foundation for implementing custom annotation experiences in Tator.
Canvas applet overview
Canvas applets are a special type of applet in Tator that are loaded with the annotation page. After being registered for a project, they can be activated from the applet button in the annotation view. Activating the applet transfers the currently displayed image or video frame to a new view defined by the applet, allowing the user to annotate using a custom user interface. There are many applications for this, such as algorithm assisted annotation, computing custom attribute values, or interfacing to external services. Closing the applet returns the user to the original annotation view with any updated annotation data made via the applet.
Understanding the example applet
The example applet below centers around a custom web component CanvasApplet that extends a base class CanvasAppletElement defined in tator-js. Let's dive into the functional role of the methods overridden in the example.
Canvas Mode Methods: These methods define the operational modes of the applet in addition to those defined by the base class (zoom in/out and pan). In our example we define a point method which is activated by clicking the point button.
Toolbar Methods: This subset of methods is responsible for adding custom buttons to the applet's toolbar, specifically a "Point" button in this case, and managing their states.
Canvas Methods: These are overridden methods that handle canvas interactions like mouse clicks and movements, tailored to operate in the context of the applet's specific modes (e.g., displaying coordinates in "point" mode).
Info Panel Methods: Methods in this category are tasked with creating and managing an information panel that displays data relevant to the applet's state, such as mouse coordinates and current frame information.
Per-frame / Show Methods: These methods update the applet's display and internal state in response to changes in the data or the applet's visibility, ensuring the interface reflects the most current context.
Save the example applet
The source code for an example canvas applet is below.
<!DOCTYPE html>
<html>
<head>
  <link rel="stylesheet" type="text/css" href="/static/components.css"></link>
  <script>
    const BACKEND = '{{ backend }}';
    const KEYCLOAK_ENABLED = '{{ keycloak_enabled }}';
  </script>
  <script src="/static/annotation.js"></script>
  <script src="/static/components.js"></script>
  <script src="/static/util.js"></script>
</head>

<body style="padding: 0px;">
<script type="module">

import { getApi } from "/static/tator.js";

/**
 * Example canvas applet
 *
 * This applet is organized into the following sections:
 * - Canvas mode methods
 * - Toolbar methods
 * - Canvas methods
 * - Info panel methods
 * - Per-frame / show methods
 *
 */
class CanvasApplet extends tatorUi.annotation.CanvasAppletElement {

  /**
   * @override
   *    If we were keeping all the buttons, it is likely an applet does not need to override this
   *    since the init() function exists along with other applet specific initialization methods.
   *
   *    In this example, we will change the default select button to the mask button.
   */
  constructor() {
    super();
    this._selectButtonEnabled = false;
  }

  /**
   * @override
   *    Provide a menu icon specific to this applet
   */
  getIcon() {
    return `
    <svg xmlns="http://www.w3.org/2000/svg" class="no-fill" width="24" height="24" viewBox="0 0 24 24" stroke-width="1" stroke="currentColor" fill="none" stroke-linecap="round" stroke-linejoin="round">
      <path stroke="none" d="M0 0h24v24H0z" fill="none"></path>
      <path d="M12 12m-1 0a1 1 0 1 0 2 0a1 1 0 1 0 -2 0"></path>
      <path d="M12 12m-9 0a9 9 0 1 0 18 0a9 9 0 1 0 -18 0"></path>
    </svg>
    `;
  }

  //
  // CANVAS MODE METHODS
  // These methods allow the applet to be in particular modes. These typically coincide with
  // the toolbar buttons. They get deselected and selectAppletCanvasMode expect to visually indicate
  // what mode the applet is in (e.g. outline the button).
  //

  /**
   * @override
   *    Parent class has modes like "zoom-in", "zoom-out", "pan", and "select". View setCanvasMode()
   *    This adds to that list.
   * @return
   *    Provide a list of applet specific modes.
   */
  getAppletCanvasModes() {
    return ["point"];
  }

  /**
   * @override
   * What mode should be selected when the applet resets? (e.g. frame is changed)
   */
  getDefaultMode() {
    return "point";
  }

  /**
   * @override
   *    Called when an applet specific mode is requested with setCanvasMode()
   * @param {string} mode
   *    Matches one of the modes in getAppletCanvasModes
   */
  selectAppletCanvasMode(mode) {
    if (mode == "point") {
      this._frameCanvas.style.cursor = "default";
      this._pointButton.classList.add("btn-purple50");
    }
  }

  //
  // TOOLBAR METHODS
  //

  /**
   * @override
   *    Add applet specific toolbar buttons in between the the select button and the
   *    zoom/pan buttons.
   */
  addAppletToolbarButtons() {

    this._pointButton = document.createElement("button");
    this._pointButton = CanvasApplet.createButton(
      "Point",
      `
      <svg xmlns="http://www.w3.org/2000/svg" class="no-fill" width="24" height="24" viewBox="0 0 24 24" stroke-width="1" stroke="currentColor" fill="none" stroke-linecap="round" stroke-linejoin="round">
        <path stroke="none" d="M0 0h24v24H0z" fill="none"></path>
        <path d="M12 12m-1 0a1 1 0 1 0 2 0a1 1 0 1 0 -2 0"></path>
        <path d="M12 12m-9 0a9 9 0 1 0 18 0a9 9 0 1 0 -18 0"></path>
      </svg>
      `);

    this._sidebar.appendChild(this._pointButton);
    this._pointButton.addEventListener("click", () => {
      this.setCanvasMode("point");
      this._pointButton.blur();
    });
  }

  /**
   * @override
   *    This is called whenever a canvas mode has been selected.
   *    Need to deselect applet specific toolbar buttons.
   */
  deselectAppletToolbarButtons() {
    this._pointButton.classList.remove("btn-purple50");
  }

  //
  // CANVAS METHODS
  //

  /**
   * @override
   *    If the current mode is one of the applet modes, then this is called instead of
   *       any of the parent-specific callbacks.
   *    Generally one does not need to use the visible coordinates, those are coordinates
   *       of the visible canvas which can be a subset of the offscreen canvas.
   *    The offscreen canvas is a scaled version of the entire image.
   *
   *    For this example, we are going to display the location of the mouse click if we are
   *       in point mode.
   */
  applyAppletMouseClick(visibleCoordinates, offscreenCoordinates) {

    if (this._canvasMode == "point") {
      this._mouseClickText.setValue(`${offscreenCoordinates[0].toFixed(3)}, ${offscreenCoordinates[1].toFixed(3)}`);
      this._offscreenCoordinates = offscreenCoordinates;
      this.redrawCanvas();
    }
  }

  /**
    * @override
    *    If the current mode is one of the applet modes, then this is called instead of
    *      any of the parent-specific callbacks.
    *    Generally one does not need to use the visible coordinates, those are coordinates
    *       of the visible canvas which can be a subset of the offscreen canvas.
    *    The offscreen canvas is a scaled version of the entire image.
    *
    *    For this example, we are going to display the location of the mouse move if we are
    *       in point mode.
    */
  applyAppletMouseMove(visibleCoordinates, offscreenCoordinates) {

    if (this._canvasMode == "point") {
      this._mouseMoveText.setValue(`${offscreenCoordinates[0].toFixed(3)}, ${offscreenCoordinates[1].toFixed(3)}`);
      this._offscreenCoordinates = offscreenCoordinates;
      this.redrawCanvas();
    }
  }


  /**
    * @override
    *    If the current mode is one of the applet modes, then this is called instead of
    *      any of the parent-specific callbacks.
    *
    *    For this example, we are going to remove the crosshairs when the users moves the mouse
    *      outside the canvas.
    */
    applyAppletMouseOut() {

      if (this._canvasMode == "point") {
        this._offscreenCoordinates = null;
        this.redrawCanvas();
      }
    }

  /**
   * @override
   *    Draw an applet data after the frame has been drawn.
   *    The applet has to draw on the offscreen canvas and this example demonstrates how.
   *    The parent class takes the ROI of the offscreen canvas and draws that on the visible canvas
   *       (what the user sees in the applet). This is done to account for zooming and panning.
   */
  drawAppletData() {

    if (this._canvasMode == "point") {

      if (this._offscreenCoordinates == null) {
        return;
      }

      // Draw the horizontal line
      this._offscreenCanvasContext.strokeStyle = "#FFFFFF";
      this._offscreenCanvasContext.lineWidth = 3;
      this._offscreenCanvasContext.globalAlpha = 0.5;

      this._offscreenCanvasContext.beginPath();
      var x1 = 0;
      var x2 = this._frameCanvas.offscreenCanvas.width;
      var y1 = this._offscreenCoordinates[1] * this._frameCanvas.offscreenCanvas.height;
      var y2 = this._offscreenCoordinates[1] * this._frameCanvas.offscreenCanvas.height;
      this._offscreenCanvasContext.moveTo(x1, y1);
      this._offscreenCanvasContext.lineTo(x2, y2);
      this._offscreenCanvasContext.stroke();

      // Draw the vertical line
      this._offscreenCanvasContext.beginPath();
      var x1 = this._offscreenCoordinates[0] * this._frameCanvas.offscreenCanvas.width;
      var x2 = this._offscreenCoordinates[0] * this._frameCanvas.offscreenCanvas.width;
      var y1 = 0;
      var y2 = this._frameCanvas.offscreenCanvas.height;
      this._offscreenCanvasContext.moveTo(x1, y1);
      this._offscreenCanvasContext.lineTo(x2, y2);
      this._offscreenCanvasContext.stroke();

    }

  }

  //
  // INFO PANEL METHODS
  // These methods are associated with the right-side information panel UI
  //

  /**
   * @override
   */
  createInfoPanel() {

    var wrapperDiv = document.createElement("div");
    wrapperDiv.setAttribute("class", "d-flex flex-grow flex-justify-left px-3 mt-1 flex-column text-gray f2");
    wrapperDiv.style.width = "400px";
    this._infoWrapper.appendChild(wrapperDiv); // infoWrapper defined in init()

    this._mouseMoveText = document.createElement("text-input");
    this._mouseMoveText.setAttribute("name", "(Point) offscreen mousemove");
    this._mouseMoveText.setAttribute("type", "string");
    wrapperDiv.appendChild(this._mouseMoveText);

    this._mouseClickText = document.createElement("text-input");
    this._mouseClickText.setAttribute("name", "(Point) offscreen mouseclick");
    this._mouseClickText.setAttribute("type", "string");
    wrapperDiv.appendChild(this._mouseClickText);

    this._frameText = document.createElement("text-input");
    this._frameText.setAttribute("name", "Current Frame");
    this._frameText.setAttribute("type", "int");
    wrapperDiv.appendChild(this._frameText);

    this._versionText = document.createElement("text-input");
    this._versionText.setAttribute("name", "Current Version");
    this._versionText.setAttribute("type", "string");
    wrapperDiv.appendChild(this._versionText);

  }

  //
  // PER-FRAME / SHOW METHODS
  // These methods update the applet when its loaded
  //

  /**
   * @override
   *    There are two methods to consider when the applet is shown.
   *    1. show()
   *    2. updateFrame()
   *
   *    updateFrame will update the cavans with the current frame, but it happens asynchronously
   *    show(), however, will be called immediately
   */
  show(data) {

    // Must do this to respond to window resize correctly.
    // Also sets the default mode
    super.show(data);

    // this._frame will eventually match this in updateFrame(), but it is done asychronously
    // as the canvas is being updated. So it is likely show() will be executed prior
    // to updateFrame() being called
    this._frameText.setValue(data.frame);

    // this._data is set in init()
    this._versionText.setValue(this._data._version.name);

  }

}

customElements.define("canvas-applet", CanvasApplet);

</script>

<div>
  <canvas-applet id="mainApplet"></canvas-applet>
</div>

</body>
</html>
Copy the source code into a local HTML file and save it.
Register the applet
Visit the project settings page for a new or existing project, then click Applets > + Add new. Set a name, description, and upload the applet under HTML File. Add a category with value annotator-canvas.
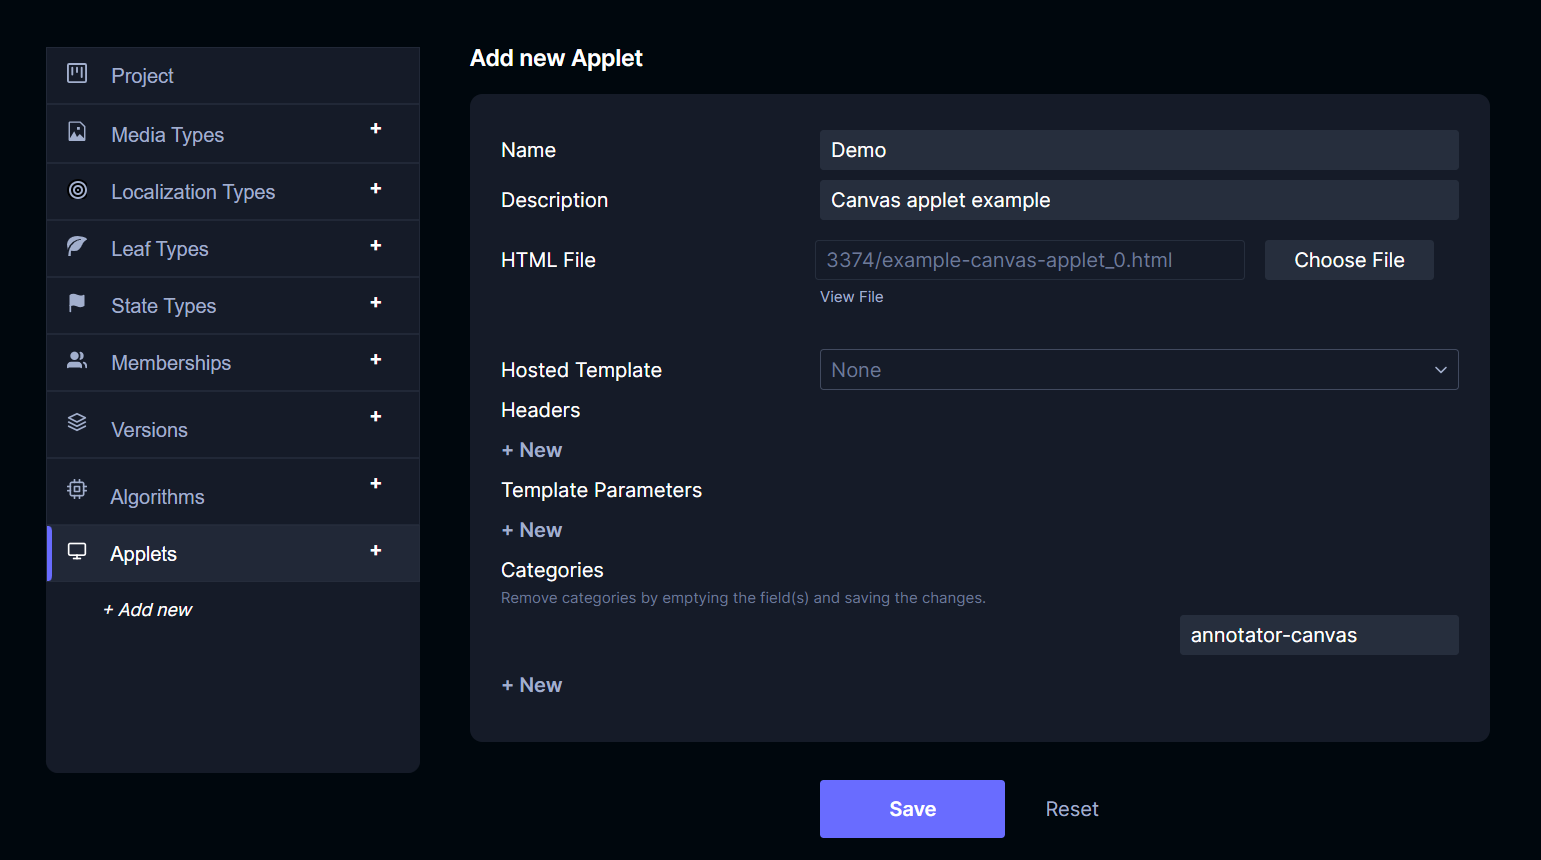
Click Save.
Visit the annotation view and open the applet
Open a media file in the annotation view and click the applets button and select the applet that was just registered.
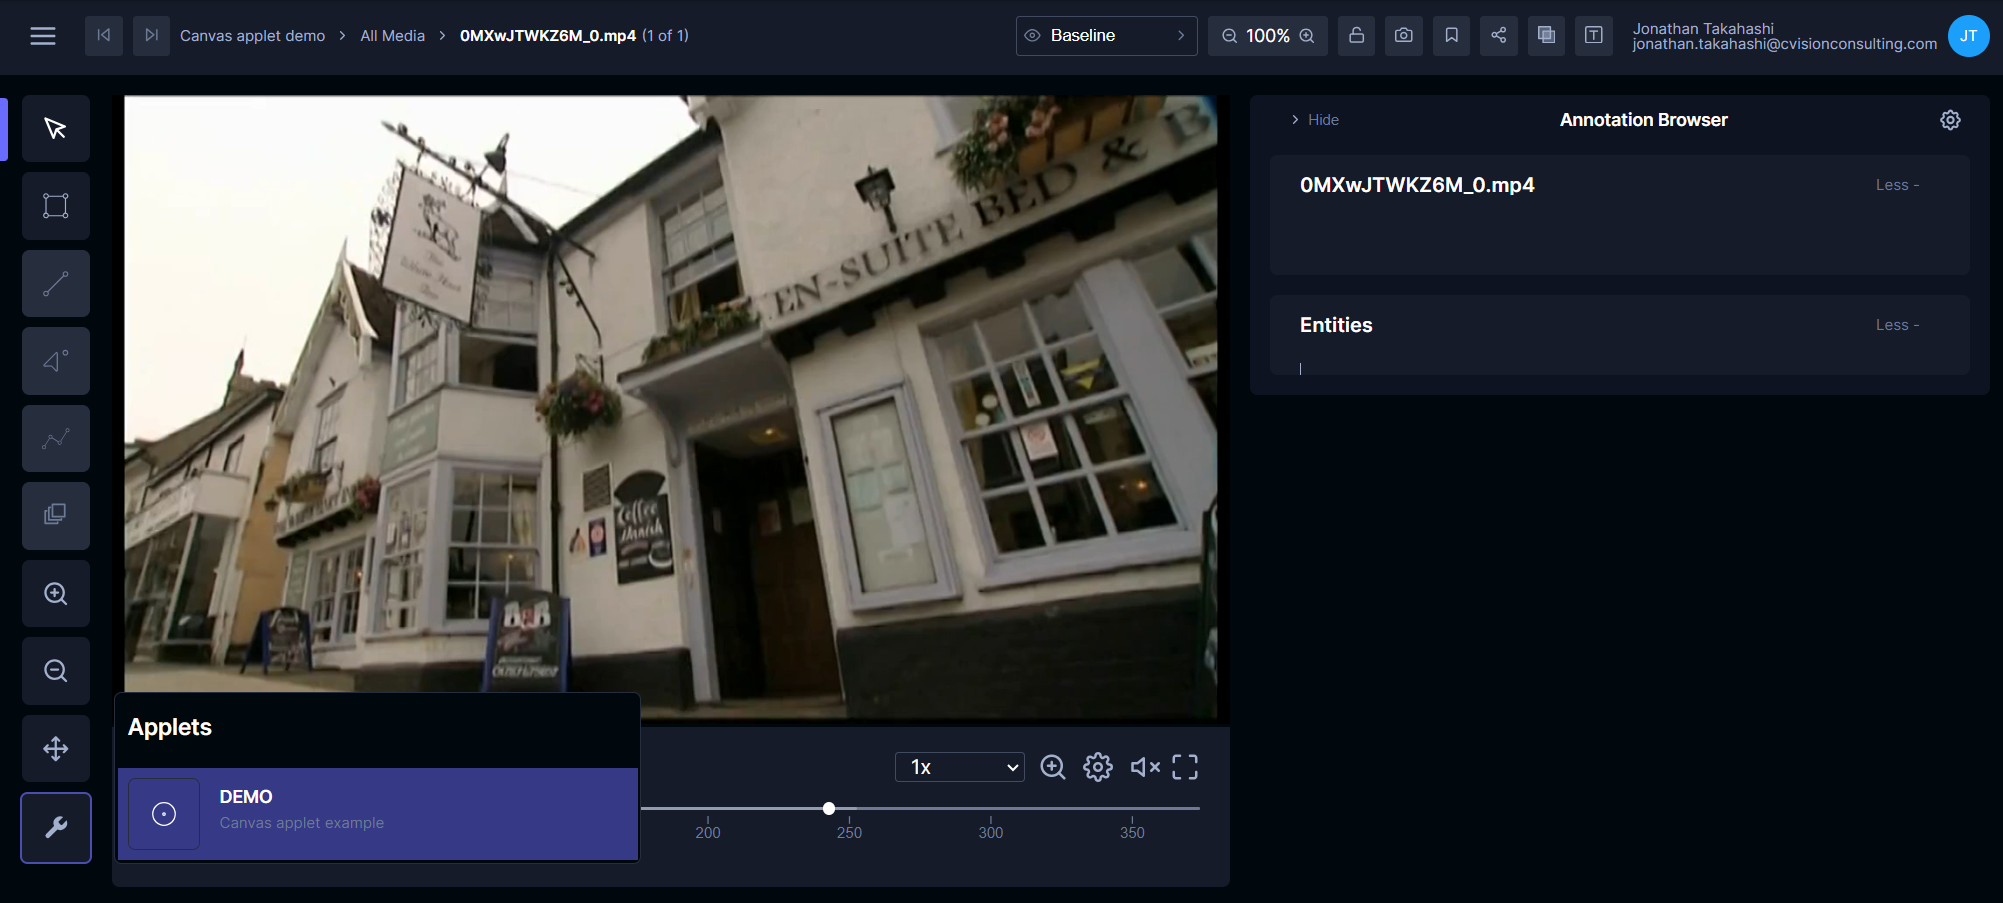
The display will update, showing the same video frame but with a new set of controls.

Experiment with the controls, note how the data is updated by cursor location of the Point tool.